The Complete Roof Lanterns Purchasing Guide: What You Need to Discover
When evaluating roof lanterns, homeowners often miss important aspects that affect their choice. Comprehending styles, materials, and installation requirements is crucial. Each element plays a role in both aesthetics and functionality. Additionally, the right measurements and upkeep routines can greatly impact the lantern's longevity. Examining these factors will help anyone make an well-researched choice about enhancing their space with natural light. The following sections will provide deeper insights into each consideration.
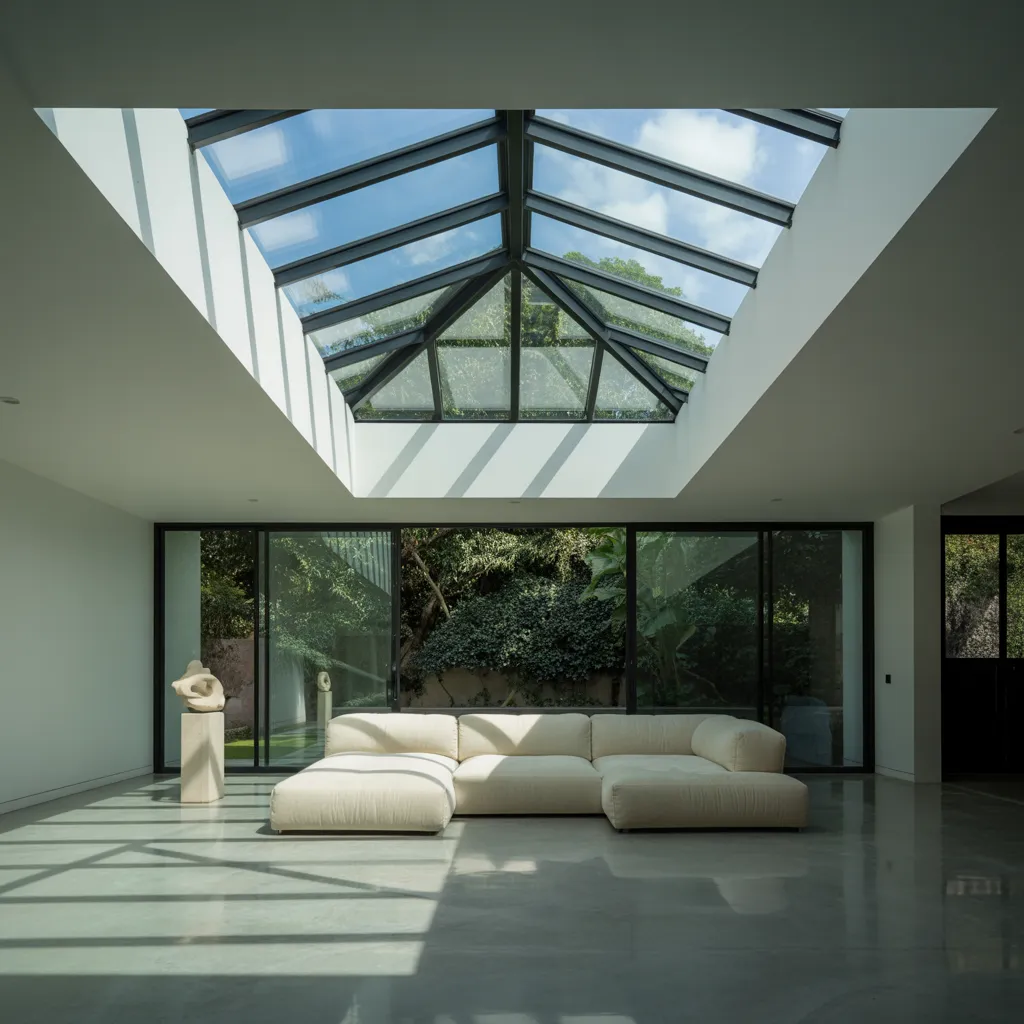
The Perks of Putting In a Roof Lantern
When homeowners consider refining their residential areas, incorporating a roof lantern often emerges as a persuasive option. This architectural feature not only elevates the aesthetic appeal of a home but also amplifies natural light, creating a brighter, more engaging environment. By enabling sunlight to rush in, roof lanterns can markedly diminish the need for artificial lighting during the day, leading to potential energy savings.
In addition, roof lanterns can enhance ventilation, improving air flow within a space. This feature is notably beneficial in areas such as kitchens or living rooms, where fresh air is necessary. Furthermore, they can add visual height to a room, causing spaces to feel more expansive and more open. Homeowners may also notice that a roof lantern enhances the overall appeal of their property, appealing to prospective buyers. Ultimately, the installation of a roof lantern can transform a home, combining functionality with style.
Top Styles of Roof Lanterns to Think About
Roof lanterns are found in a variety of designs, each providing distinct design traits that can enhance different architectural aesthetics. One well-liked style is the traditional lantern, defined by its intricate details and classic proportions, often ideal for period homes. In contrast, contemporary or modern roof lanterns offer sleek lines and minimalist designs, making them perfect for modern buildings. Another notable style is the pyramid lantern, which introduces a distinctive geometric element, great for improving the roof’s symmetry. Flat or skylight lanterns provide a sleek appearance, fitting seamlessly into the roofline and enhancing light while not overwhelming the space. Additionally, vaulted lanterns, with a raised central section, create a striking visual impact and amplify the sense of height within a room. Each style offers unique benefits, giving homeowners the choice of a roof lantern that matches their individual style and the overall design of their property.
Best Options for Your Roof Lantern
Deciding on the ideal material for a roof lantern is essential for durability and aesthetic appeal. Widely-used materials include aluminum, timber, and uPVC, each offering unique benefits. Aluminum is manageable in weight and protected against corrosion, making it a popular choice for modern designs. Its ability to accept powder-coating allows for a assortment of pigments, improving aesthetic value.
Timber introduces a natural heat and personality, well-suited for classic environments. However, it calls for routine care to prevent climate damage. The choice of quality hardwoods can boost durability, but they are often more expensive.
uPVC is a budget-friendly choice recognized for its minimal upkeep and energy efficiency. It is immune to rot and can mimic the appearance of wood without the upkeep.
In the end, the selection of material should correspond with the desired aesthetic, maintenance needs, and environmental considerations, ensuring the roof lantern complements the overall architecture of the home.
How to Figure Out the Correct Size for Your Area
When picking a roof lantern, accurate measurements of the room are crucial for ensuring a proper fit. Additionally, adjustments for ceiling height can greatly affect the overall aesthetics and functionality of the space. Thoughtful evaluation of these factors will lead to a more harmonious integration of the lantern into the room.
Calculate Your Room Space
To guarantee that a roof lantern enhances a space rather than overpowers it, exact room measurements are essential. Homeowners should start by measuring the length and width of the room where the lantern will be installed. This offers a basis for determining the right size. It is also important to take into account the overall layout and existing architectural features, such as windows and doors, which may influence the lantern's placement. A well-measured room allows for the choice of a lantern that boosts aesthetics and functionality. Additionally, visualizing the lantern's size in the intended space can aid in making an informed decision. This thorough evaluation ensures that the roof lantern becomes a harmonious addition to the room.
Look Into Ceiling Height Changes
How can the height of the ceiling influence the selection of a roof lantern? The height of a ceiling plays a vital role in deciding the appropriate size and design of a roof lantern. Taller ceilings can accommodate bigger, more impressive lanterns that become a centerpiece in the room. Conversely, lower ceilings may require more smaller designs to avoid crowding the space. Additionally, the height affects the placement of the lantern; it should be positioned to maximize natural light while ensuring it doesn’t obstruct views or create a claustrophobic feeling. As a result, measuring ceiling height is essential for selecting a lantern that coordinates with the room's proportions, enhancing both aesthetics and functionality. Ultimately, a carefully selected roof lantern can create an inviting and spacious environment.
Critical Factors for Selecting the Perfect Roof Lantern
What aspects should one evaluate when choosing the best roof lantern? First, the size and scale of the lantern must match the space. An overly large lantern can overpower a small room, while a minimal option may seem trivial. Next, the appearance should match the structural aesthetic of the property; modern homes may take advantage of minimalist, contemporary designs, whereas traditional homes might necessitate ornate features.
Material is another vital factor. Options range from aluminum to timber, each delivering different looks and durability degrees. Additionally, glazing type affects both insulation and natural light; double or triple glazing is optimal for energy efficiency.
In conclusion, the primary function of the space should guide the choice. A kitchen or living area may require more light than a hallway. By assessing these factors, individuals can confirm their choice strengthens both functionality and visual appeal.
Hassle-free Ways to Put in Your Roof Lantern
Installing a roof lantern demands possessing the proper equipment which is crucial for a seamless installation. This section outlines a clear, step-by-step approach to ensure effective installation. By following these guidelines, homeowners can obtain a sturdy and aesthetically pleasing outcome.
Resources You'll Require
When installing a roof lantern, a number of important tools are needed to guarantee a smooth and productive installation. First, a measuring tape is used to verify the correct dimensions of both the opening and the lantern. A level is crucial to ensure the lantern sits flat, stopping any leaks or structural issues later on. A power drill is required for creating pilot holes and securing screws, while a utility knife helps cut any required materials. To protect against related resource sharp edges and debris, safety glasses and gloves should be worn. Additionally, a ladder or scaffold gives safe access to the work zone. Having these tools accessible will make easier the installation, making the process simpler and more effective.
Detailed Step-by-Step Directions
A correctly done roof lantern installation can considerably boost both the visual appeal and performance of a space. To begin with, verify that the area is clean and free of debris. Next, accurately measure and mark the extent of the lantern frame on the roof. Cut the opening carefully using appropriate tools. Install a waterproof membrane around the edges to prevent water ingress. Once prepared, place the lantern into the opening, ensuring it is aligned and firm. Fasten it with screws and apply sealant around the edges for added defense. Finally, connect any necessary electrical components, ensuring compliance with safety regulations. After installation, inspect the lantern for stability and test for any leaks during rainfall. Proper installation ensures longevity and performance.
How to Care for Your Roof Lantern for Longevity
Caring for a roof lantern is important to ensure its longevity and beauty. It is imperative to regularly clean it; debris, dirt, and algae can build up, obstructing the light and damaging materials. Homeowners should use a mild soap solution and a soft cloth to clean gently the glass panels and frames, not using harsh chemicals that could result in color changes or damage.
Frequent inspection of seals and flashing helps stop leaks and water damage. Any signs of degradation should be taken care of rapidly, either through resealing or replacement. Additionally, checking for loose components, including screws and copyrights, preserves structural integrity.
Seasonal servicing, notably before winter, is vital. Removing snow and ice prevents excessive weight and potential breakage. Finally, seeking advice from a specialist for routine inspections can identify issues that may not be immediately visible, safeguarding the roof lantern's functionality and appearance for years to come.
Regularly Posed Questions
Do roof lanterns function When installed on flat roofs?
Roof lanterns can absolutely be fitted on flat roofs, provided appropriate waterproofing and structural support are implemented. This placement permits improved natural illumination and aesthetic appeal while preserving durability against weather conditions.
What Is the Typical Cost of a Roof Lantern?
Roof lantern costs typically spans £500 to £2,500 as an average, shaped by considerations such as size, materials, and design. Installation fees and tailored selections can further influence the end cost.
Can Roof Lanterns Assist with Energy Conservation?
Roof lanterns can be energy-efficient, particularly when made with premium dual or triple-layer glass. They enhance natural light, potentially reducing reliance on artificial lighting, which can lead to reduced power usage and expenses over time.
What Effect Do Roof Lanterns Have on Home Coverage?
Roof lanterns have the potential to positively affect home insurance through boosting property worth and elevating visual appeal. However, if inadequately installed or left unmaintained, they may escalate damage potential of damage, potentially causing higher premiums or claims.
Is My Roof Lantern Look Customizable?
Yes, roof lantern patterns can be adapted. Homeowners may pick different finishes, configurations, and dimensions to align with their style choices and structural aesthetic. Personalization options boost both usefulness and design attractiveness in home design.